There are two ways I got things to work so I am going to write two clear articles instead of mixing them both into a confusion mess. This entire article is in three parts:
- Basic Setup (this Article)
- Arduino Library the easy way
- Arduino Library Compiling in Eclipse
So here is what you need to cook up eclipse to run arduino.
- Java run time 6 or above…
- Eclipse C++
- AVR Plugin for Eclipse
- Arduino 0023 (last sane version)
- An Arduino board- I used an uno but you can modify the instructions to suite your needs.
Step 1: Setup eclipse for C++.
Download and install Eclipse for C++. There are a lot of people out there including myself that are already using eclipse for java or android-java or something so you might ask why the C++ version. Well the reason is that arduino uses gcc compiler and it needs a plugin for that. If you are using the eclipse version for c++ then great! Else here is what you do.
Start eclipse. In the Window > Preferences(Click). In the let pane, select Available software sites…
[caption id="attachment_391" align="aligncenter" width="300" caption="Enable Sources"]
 [/caption]
I am using Eclipse Indigo so I checked the “Indigo” labeled sources. We will add the arduino source later- That where you get the avr plugin from. Click OK
Next click Help> Install New Software…
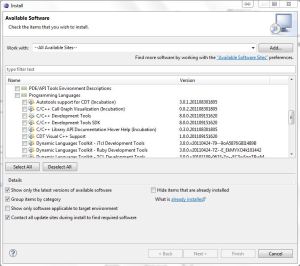
Select WORK WITH ALL AVAILABLE SITES and find the Programming Languages section.
Select C/C++ Development Tools. Install just that and you are good.
[caption id="attachment_389" align="aligncenter" width="300" caption="Install the CDT plugins"]
 [/caption]
Like I said before, you don’t need to go through this step if you directly download the eclipse for C++.
Step 2: Install Arduino 0023.
Download the arduino 0023 zip file and extract it at a convenient location. It contains libraries and the compiler as well as the arduino core libraries which are essentially an extension of the C++ language using functions and macros. I put mine in the root of my secondary partition. I am assuming you install in G:\Arduino-0023. Replace with your own path in the later steps.
Step 3: Install the AVR Plugin for eclipse
Again start eclipse and goto Help> Install New Software…
Click [ Add… ] and enter Arduino or something as the name and the location as:Â http://avr-eclipse.sourceforge.net/updatesite/
[caption id="attachment_392" align="aligncenter" width="300" caption="AVR Plugin Source"]
 [/caption]
Click OK and select the source… This time Select the CDT Optional Features and Install…
This will add the plugin to your eclipse environment.
Step 4: Configure the Plugin…
After the plugins have been installed they need to be configured. Specifically, the paths to the AVR Tools need to be verified.
Open the Eclipse Preferences: Eclipse > Preferences. Go down to the AVR category and select “Paths”. Set the paths as shown in the screen shot.
[caption id="attachment_393" align="aligncenter" width="300" caption="Set Paths for plugin"]
 [/caption]
Select the AVRDude category. Setup the AVRDUDE config file as shown.Â

You will not have any Programmer Configurations by default. Lets build one… Click Add… Setup things as…

Click OK. Then close the preferences.
That basically does it for the basic config.
No comments:
Post a Comment