Introduction
A lot of projects and products involve a user interface which is buttons and switches and knobs. The cost of industry grade panel push buttons is really high and it gets worse as the buttons become environment proof. With that said, Capacitive Touch sensing has come in to replace mechanical buttons and the Cypress CapSense MBR3 does exactly that. The solution is a single chip auto calibration system which does most things for you. Most Capacitive Touch sensing solutions offered need a lot of technical expertise but Cypress claims that their solution is just easier to use. I will be reviewing the developer side of the solution as opposed to the kit itself.
All the necessary documentation and my programs as well as demos are available at github here(link)
What's not here (But I can include on demand)
Even though we usually never add this section to a review, I want to clarify to the readers exactly I did not include the following in this article:
- No Un-Boxing. My friends at element14 group have already done an excellent job of it and I don't want to redo that.
- No Installation instructions etc. There is a user guide available and the software is pretty simple and straight forward.
My intention here is to find out if I can really use it in a product hence I have a goal in mind- to find out if I can make a product with it. The product I intended is an industrial remote control panel which will be used in "unfriendly" and rainy environment. I already have the product in the field for the last 4 years and I have not made any changes to it in the last 3 years. Its perfect! But the problem is the cost and unreliability of the physical buttons. My customer wants the system to be ultra cheap and my design is exactly that. So I have the following questions that I wanted to research. This makes up my parts of review.
- Is it budget friendly? If I can't afford it, I won't bother experimenting with it.
- Does it really do what it says? If I spend time designing with it and it does not work as expected, I will have wasted time.
- Is it too complicated or requires specific skill sets to work with? If I need to have a specialist do my board design and stuff then I will have overhead costs which will offset my profit margin.
- Can I reuse it once I am done? Do I need to redo everything design wise everytime I use the solution or can I reuse some stuff like code, layout etc. I am also a private consultant and I am always building my database of modules that I can reuse.
Lets get started...
First Question: Is it budget friendly? If I can't afford it, I won't bother experimenting with it.
This is queried even before I applied for the roadtest. The design guide says there are two interesting part that have buttons. They are CY8CMBR3108 and CY8CMBR3102. The CY8CMBR3 is the MBR3 part code and the 102 means I2C with 2 buttons and 110 means I2c with 10 buttons. 002 would mean two buttons with no I2C! The pricing on the element 14 website is as:
- CY8CMBR3102-SX1I: one for 131.10 and
- CY8CMBR3110-SX2I: one for 197.40
By the way element14, the listing says both are 1 channel. It does not say I2C which was misleading and I initially thought they were single button chips. Corrections?
So I think they are within budget IF they are easy enough to use. If I end up spending days on design then its no good.
Second Question: Does it really do what it says? If I spend time designing with it and it does not work as expected, I will have wasted time.
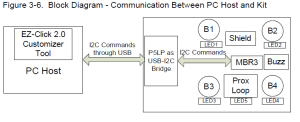
Well that is why we have kits! I started looking at what I had received. It turns out I have a board with a PSOC 5 and the MBR3 Chip. The block diagram is given below:
[caption id="attachment_903" align="aligncenter" width="300"]
 Capsense Block Diagram[/caption]
It is clear that P5LP part is sending the I2C commands. The EZ-Click utility comes bundled with a PSOC programmer which means that the utility is a GUI for generating limited permutations of code which gets written to the PSOC5. The device then resets and executed the routine to configure the MBR3 chip. I would have liked to see the code and play a little with it, but I guess that can be done using an external PSOC kit. Its a bit of a waste. Cypress should provide a whitepaper on how to use the MBR3 Kit with their PSOC designer software. Too bad.
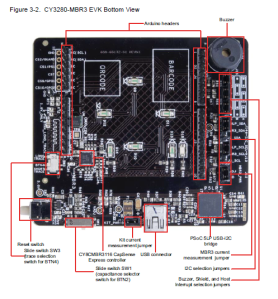
[caption id="attachment_904" align="aligncenter" width="278"]
 Capsense MBR3 Board[/caption]
The diagram above shows the backside of the supplied kit. I was impressed with the thought behind putting so many test scenarios on a kit. Whoever designed this kit... Respect!
I usually never read the instructions manual and this was not different. I installed the software and programmed the kit with one of the pre-compiled demos. I then waited for a rainy day not because I dont have water but because the humidity causes Capsensing solutions do behave err "differently" The video below is what I found.
[youtube=http://youtu.be/-4TPfnIYbO4]
I did a number of trials after the video and found that all four buttons work. I must also admit that the PCB was never really fastened to the glass which could mean that there would have been an air gap which resulted in the variation in performance. This leads me the conclusion that the PCB MUST be either screwed or super-glued to the front with no bubbles... this is a dependency on the production staff but should not be a big issue.
I also tried it with varying quantities of water. It was worth noting that even though water on a single button did not effect it's working, but while the water quantity varied, the MBR3 was confused and buttons submerged in water refused to work. Video for reference.
[youtube=http://youtu.be/0C_19geALhs]
Third question 3. Is it too complicated or requires specific skill sets to work with? If I need to have a specialist do my board design and stuff then I will have overhead costs which will offset my profit margin.
So it works for the most part. Now I need to understand how I can use it in my designs. I want to build a demo application around it to see if it works and for that I need a prototype. I searched the element14 website to find out if there was any demo available. I was in luck and I found an arduino based Demo. The code and documenation is avaibale at github.com
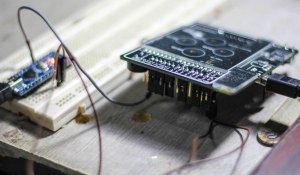
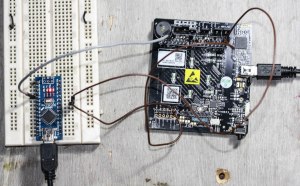
I connected the arduino to the CapSense and worked my way into the code. The EZ-CLICK software is used to generate the settings in the form of constants that are sent blindly by the Arduino over I2C to the MBR3 which configures the buttons. The connections were as simple as connecting the I2C lines and the ground lines. I powered both the boards separately but you can power the MBR3 from the Arduino.
The MBR3 Generates an interrupt when anything happens and the code reads every register and displays it on the serial port. The connections are simple. Using jumpers J15, disconnect the PSOC5 and connect the I2C lines to the headers. I used an arduino Nano where I connected the I2C lines SCL-A5 and SDA-A4. The interrupt pin goes to Pin 2 which has software interrupt 0. Thats it!
[caption id="attachment_905" align="aligncenter" width="300"]
 CapSense MBR3 with Arduino Nano[/caption]
The code works like a charm and I think software wise it was quite simple. Full credit to Cypress and Mathew Buza for the code.
[caption id="attachment_906" align="aligncenter" width="300"]
 CapSense MBR3 with Arduino Nano[/caption]
The next step here will be to get some samples and make a board of my own. Cypress, I need some samples. I went through the design documentation and it was quite good. The board design and everything will happen once I have all the parts in hand.
Fourth Question: Can I reuse it once I am done? Do I need to redo everything design wise every time I use the solution or can I reuse some stuff like code, layout etc. I am also a private consultant and I am always building my database of modules that I can reuse.
Well the code is really simple and is almost always reusable. I am still unclear on the board re-usability since that part is still pending. All I can say is that looking at how the system adapts to variations in track length and capacitances, it should not be too hard. Will have to wait for some time to find out.
Concluding remarks
This review can be considered incomplete since I need to do some board design and fabrication to make sure if I can use it. Right now some industrial applications just want push buttons, but the trend is changing. I found that the MBR3 solution is simple to use in kit form. The kit itself has a PSOC5 which I would have liked to program myself but looks like I need to buy a PSOC kit for that experience. I was able to use the MBR3 an Arduino as well and seemed very easy. I will be trying to get samples of the devices and make boards of my own. Looking at the documentation, it seems quite easy as compared to others.
The MBR3 solution works in the presence of water droplets but not with a lot of water. That means you can use wet hands but not underwater. Considering the cost of the device, I think the performance was excellent and if you have a consumer product which needs capacitive touch buttons, this is the right way to go. The I2C communications mean that you make a board for the front panel and connect it via 4 wires. The LED, and buttons are taken care of by the MBR3. All in all a well designed kit for a very good product.
No comments:
Post a Comment