Introduction
I am waiting for my stuff to get delivered which are basically parts and parts. One of features of my design is that the raspberry pi center piece is portable, ie it can be moved from one location of the house to the other. For this I needed to add a battery backup which was shown in my previous posts. In my recent experiments, I found that the Raspberry Pi was rebooting unexpectedly. It turns out that one of the connectors was defective. Still this left me with the question that if I am using a battery, how long will my system stay afloat without power? Hence I setup a little experiment to measure the power consumed by the Raspberry Pi and the results were quite unexpected.
The Math
The power consumed by any device is given by
P = V x I
where P is power in watts, V is the voltage across the device in Volts and I is the Current in Amperes. Now we are supposed to use adaptors with outputs at 5V. Practically this drops as we add a load and the deviation from the set value is called regulation but we will get to that some other time. Now as a device is connected, a current will also flow which is proportional to the power consumed IF the voltage remains constant. We assume that the voltage is almost constant and hence we just need to monitor the current flowing into the Raspberry Pi. The more the current, the more the power consumed.
Regulator types short note
The Raspberry Pi B has a linear voltage regulator which is not so efficient because it regulates voltage by converting excess power into heat. The newer Raspberry Pi B+ has a switching regulator which does it's job by switching the current ON and OFF at a very fast rate. Hence the Raspberry Pi B+ should consume less power than the Raspberry Pi B under similar conditions.
The Experiment Setup
For this experiment, I am using two methods of measuring the current.
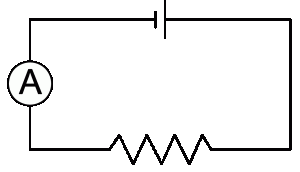
1. The Multimeter method- You can measure current using an Ammeter by connecting it in Series in the circuit. This means just cut the wire and add the meter in the circuit. The diagram below is the simplest representation for the same. In using a multimeter, we can set it to measure current. Be careful while making the connections and the settings. In my setup I selected the 10Amp range as seen in the video below.
2. Using an Oscilloscope: Instead of using an Ammeter, we can connect a small resistance called a current sense resistor. Ohms law says that the voltage drop across a resistor is proportional to the current flowing through it. Here I added 10 1Ohm resistors in parallel so as to get a 0.1Ohm resistance in series. Now I could have use 10Ohms instead which translates to 1Ohm but that would mean that for a 1Amp current, I have 1 volt drop. From 5V if I drop 1V across the resistor then the Raspberry Pi will not work right at (5V-1V) 4V. Here for a current of 1Amp, we should get a drop of 0.1V or 100mV. I then connect an oscilloscope probes across the resistance and set it to 5 Seconds per division.
The Video
[youtube=http://youtu.be/qG87WmS-Z4Q]
The video above is me running the experiment and the results.
Results
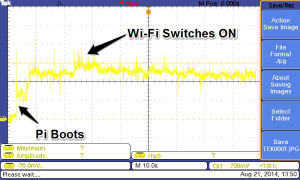
As the Pi Boots up the oscilloscope plot is as follows:

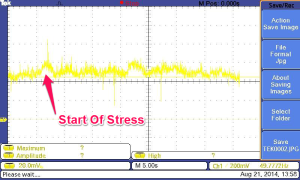
When I run the stress command as
[code]
stress --cpu 8 --io 4 --vm 2 --hdd 4 --timeout 30s --verbose --vm-bytes 128M
[/code]

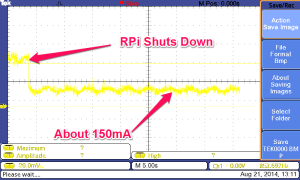
When shutdown the screen is:

Conclusion
The Raspberry Pi consumes around 150mA when shutdown and 380mA when operating. The wifi modules takes around 60mA and the Enocean Pi around 30-40mA.

No comments:
Post a Comment