Introduction
The Raspberry Pi offers an array of general purpose Input-Output pins(GPIOs) which enables software running on the Linux computer to sense events in the physical world as well as effect it in very simple ways. A software program can be used to read a switch or even a sensor connected to the GPIOs in addition to the ability to send electrical signals out. For example, a user program can be used to read a simple push button which in turn can be used to trigger events in software. The user may also elect to control a single LED by switching it ON and OFF to reflect events in software.
In this experiment, we take a look as the essentials of GPIO control by toggling an LED at predefined intervals of time. This example can be extended by the user in a number of ways in other projects as well.
Materials and tools Required
Raspberry Pi, Power Supply, microSD Card with Raspbian Installed and Setup, Internet connectivity(Optional), Bread board, connecting wires, an LED 5mm of preferred colour and a resistor of 220Ohms
Setup the hardware
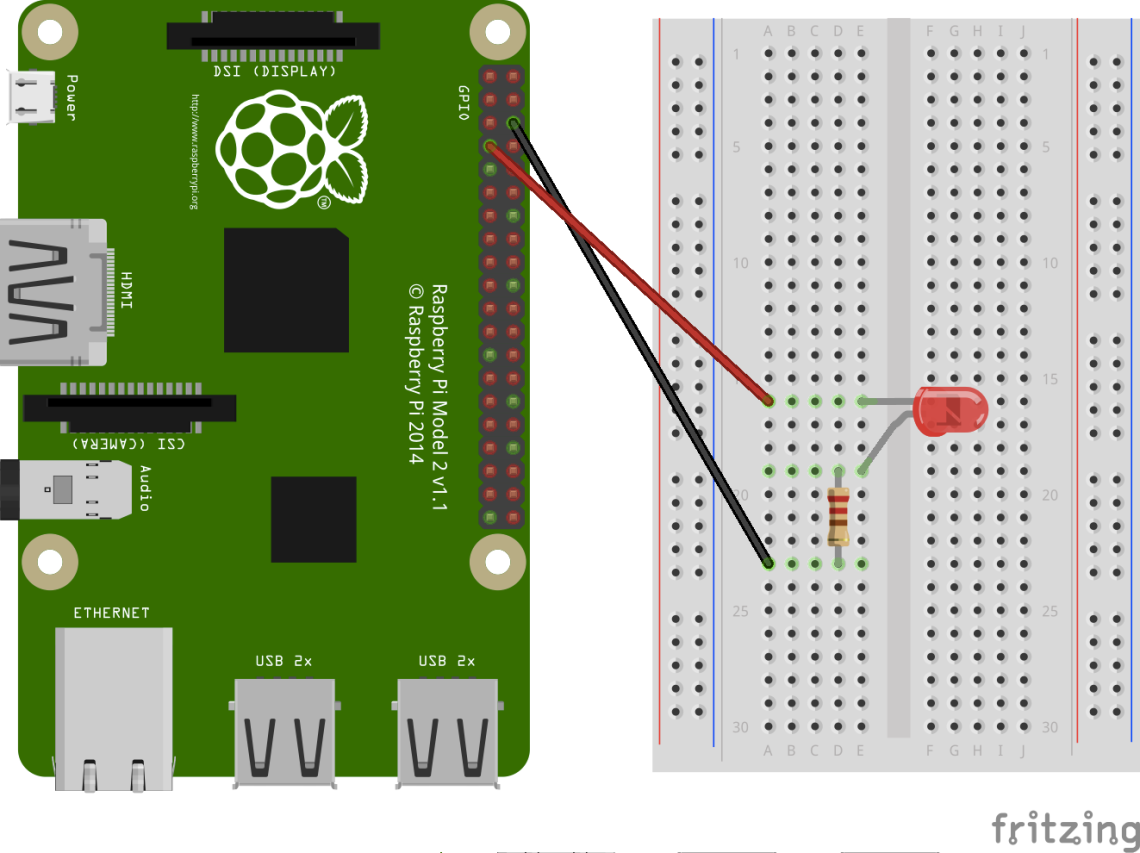
The raspberry pi has a 40 pin header with a number of pins usable as GPIOs as well as special function pins. The LED and resistor needs to be connected between a GPIO and Ground with the value of resistor being 220Ohm or 330Ohm. Larger resistors will cause the LED to be dim however smaller resistor values will allow more current into the LED and out of the GPIO. The objective is to limit the current being drawn hence the name ‘current Limiting Resistor’ is given.
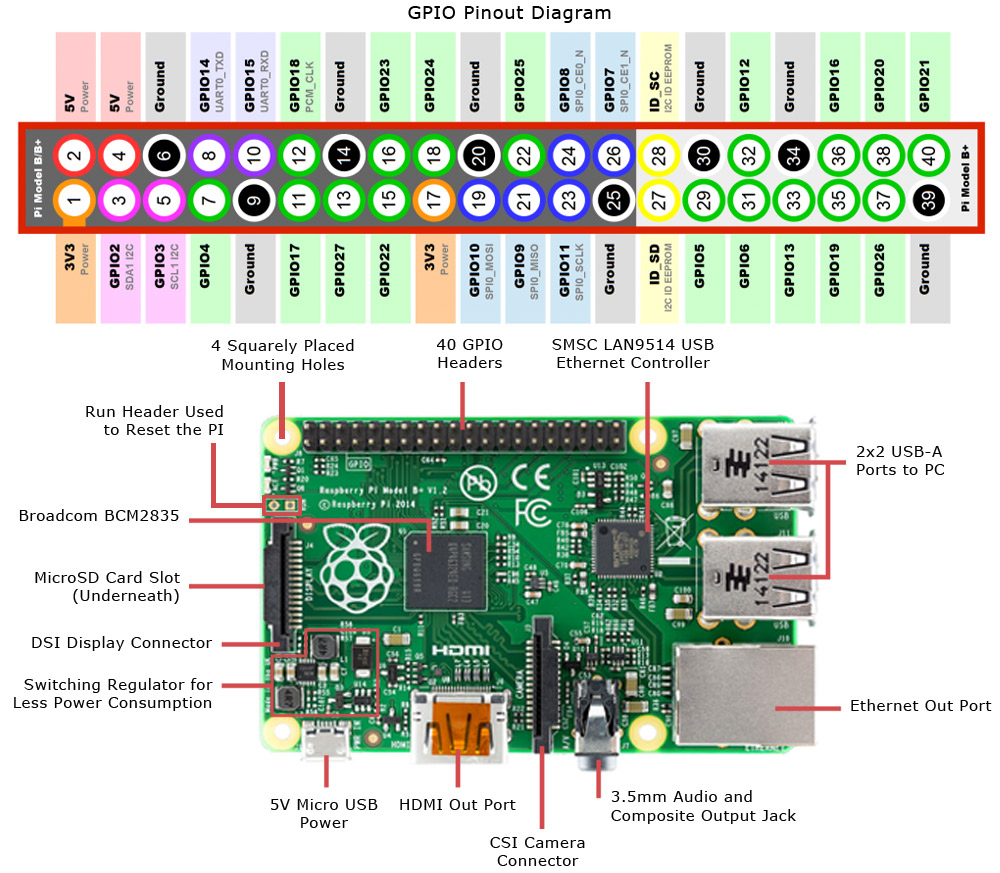 Mount the LED as well as the resistor on the breadboard as shown in the diagram below. Also wire up the connections with the Ground Pin on the Raspberry Pi as well as Pin 7 or GPIO04 as shown. A different GPIO may also be used however the code will change slightly to accommodate the change.
Setup the software
Insert the microSD Card with the Raspbian OS into the slot on the Raspberry Pi and connect the power supply. Turn it on and wait for it to boot. Once it finishes booting, you will be presented with a desktop GUI as shown below.
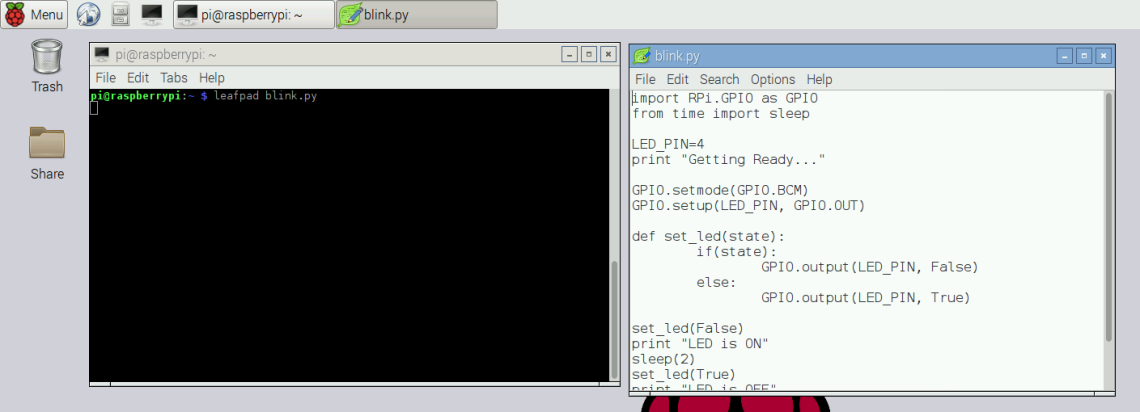 From the Application Launchbar at the top, click on the computer monitor icon to open a terminal. At the new terminal type the following command
1
leafpad blink.py
This will open up a new Leafpad editor window and you can type in the follow few lines of code:
1
2
3
4
5
6
7
8
9
10
11
12
13
14
15
16
17
18
19
20
21
22
23
24
25
26
27
28
29
30
31
32
import RPi.GPIO as GPIO
from time import sleep
LED_GPIO = 4
print “Getting ready...”
GPIO.setmode(GPIO.BCM)
GPIO.setup(LED_GPIO, GPIO.OUT)
def set_led(state):
if state:
GPIO.output(LED_GPIO, True)
else:
GPIO.output(LED_GPIO, False)
set_led(False)
print "LED is OFF"
sleep(2)
set)led(True)
print "LED is ON"
sleep(2)
set_led(False)
print "LED is OFF"
sleep(2)
set_led(True)
print "LED is ON"
sleep(2)
set_led(False)
print “Turning it off finally…"
GPIO.cleanup()
print “Bye Bye”
The code is simple enough and uses the python programming language. Modules already installed provide functionality and with RPI.GPIO and time modules, the user can control the behaviour of the GPIOs and create simple delays. The function set_led is defined to function as a simple wrapper and in the program GPIO.output(LED_PIN, True) or GPIO.output(LED_PIN, False) may be used directly if the user so chooses. The line Sleep(2) causes a delay of two seconds after which the next command in the sequence is executed. This small piece of code will make the LED blink twice before turning it off and exiting.
1
| leafpad blink.py |
1
2
3
4
5
6
7
8
9
10
11
12
13
14
15
16
17
18
19
20
21
22
23
24
25
26
27
28
29
30
31
32
| import RPi.GPIO as GPIOfrom time import sleepLED_GPIO = 4print “Getting ready...”GPIO.setmode(GPIO.BCM)GPIO.setup(LED_GPIO, GPIO.OUT)def set_led(state):if state:GPIO.output(LED_GPIO, True)else:GPIO.output(LED_GPIO, False)set_led(False)print "LED is OFF"sleep(2)set)led(True)print "LED is ON"sleep(2)set_led(False)print "LED is OFF"sleep(2)set_led(True)print "LED is ON"sleep(2)set_led(False)print “Turning it off finally…"GPIO.cleanup()print “Bye Bye” |
Running the script
In order to run the code, simply exit the leafpad editor and save when prompted. On the terminal, type the command
1
sudo python blink.py
Upon being prompted for a password enter ‘raspberry’ as the default password or the password you set incase you changed it. Experiment with delays as well as using other GPIOs as well to extend this exercise.
1
| sudo python blink.py |
No comments:
Post a Comment